Last tasks Unit 1
Once you have completed making your final print you need to ensure the whole process is documented in your website. You should then write your summative reflection referring to the unit overview (found near the bottom of this page) and ATL skills you think you have applied/developed in this unit.
Once this is done show me and I will talk you through your first tasks for unit 2.
Once this is done show me and I will talk you through your first tasks for unit 2.
| 8-4_unit_1_rubric.docx |
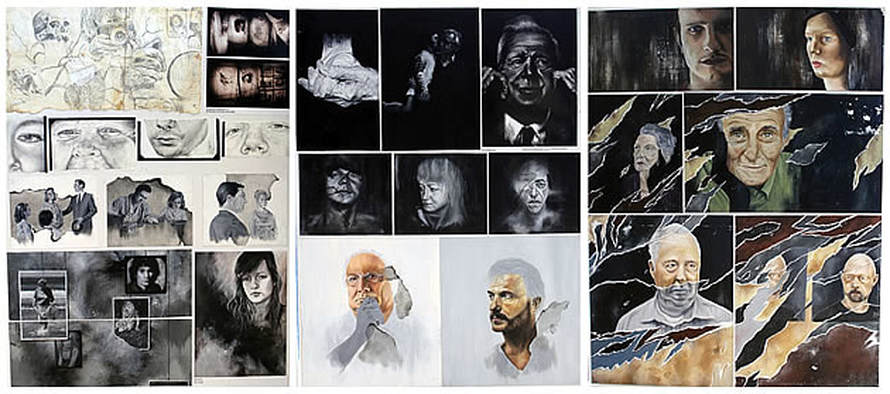
https://www.studentartguide.com/featured/high-school-painting-projects-portraiture
Refining our plan so it is usable: Design sheet
Goal: Produce the plan for your summative piece
Now that you have a basic idea for your self portrait print you will need to develop it into a COMPOSITION. This is deciding what elements/things/parts/objects/people/images will be in your print and how they will fill the space of the rectangle/square format.
REMEMBER THAT YOU MUST THINK IN TERMS OF TONE TO MAKE THINGS LOOK 3 DIMENSIONAL.
You will also decide whether you are printing in more than one colour, or on a collaged surface etc etc to show that you are striving to seek an 'unusual solution'.
You need a drawing or painting of your idea to work from. Today we are going to produce that 'draft' version.
This is a good stage to REFINE your Statement of Intent. Now that you have your draft can you be clearer about your intention? Are you more aware of how you want your piece to impact the viewer?
| print_making_identities.pptx |
Planning and "Thinking Creatively" Criterion C
Today our goal is to have made a plan for our final summative print.
You will also be exploring what other printmakers have done to get inspiration for how you will approach the brief 'creatively'. ( use the links below)
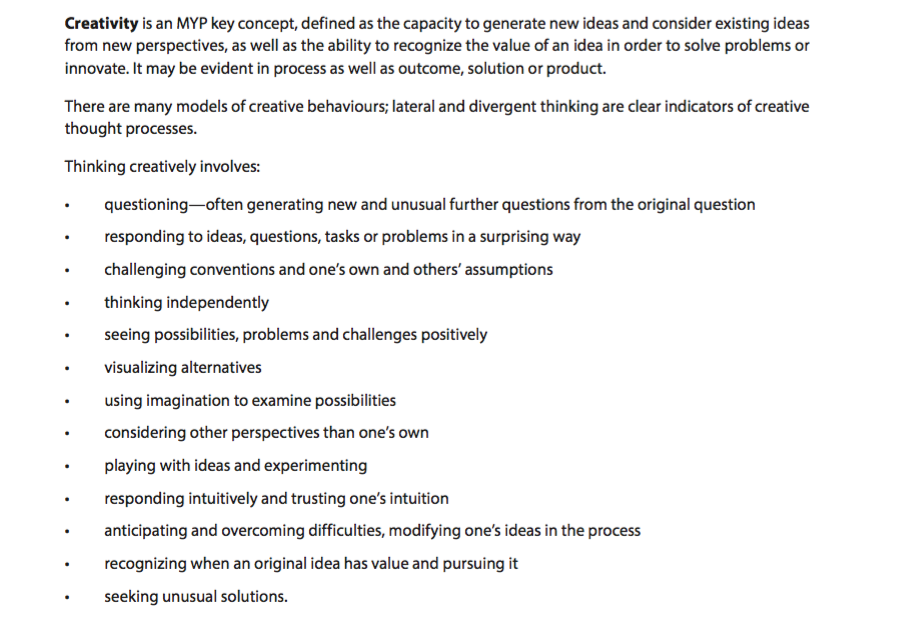
The MYP lists these things as creative thinking:
- You will think about symbolism, and what we learnt from looking at the prints by Durer and Kollwitz.
- You will mind map your thoughts about 'self'.
- You will write a draft 'Statement of Intent' with some indication of 'success criteria'.
- You will decide what you need to turn your idea into a print ( photographic sources).
- All this will be posted on your website.
You will also be exploring what other printmakers have done to get inspiration for how you will approach the brief 'creatively'. ( use the links below)
The MYP lists these things as creative thinking:
Context - making connections with other artists
We have learnt how to use tone to make our drawings look 3 dimensional. You have learnt how to make relief prints with lino and how this involves 'thinking in reverse for the orientation of the image and how we use tone. This is all good evidence for assessing your work for criterion B: Developing Skills.
The next stage of our unit is focused on criterion A: Knowledge and Understanding and Criterion D: Responding.
Tasks:
The next stage of our unit is focused on criterion A: Knowledge and Understanding and Criterion D: Responding.
Tasks:
- With a partner you will 'analyse' a print by Albrecht Dürer. His image 'Melencolia' contains lots of symbols and clues that many people have wondered about. Your job is to see if you can spot them and circle them with your partner. You will also make notes saying what you think they might mean.
- We will go over the brief you are going to work on so you can start to think of how you will make a symbolic self portrait.
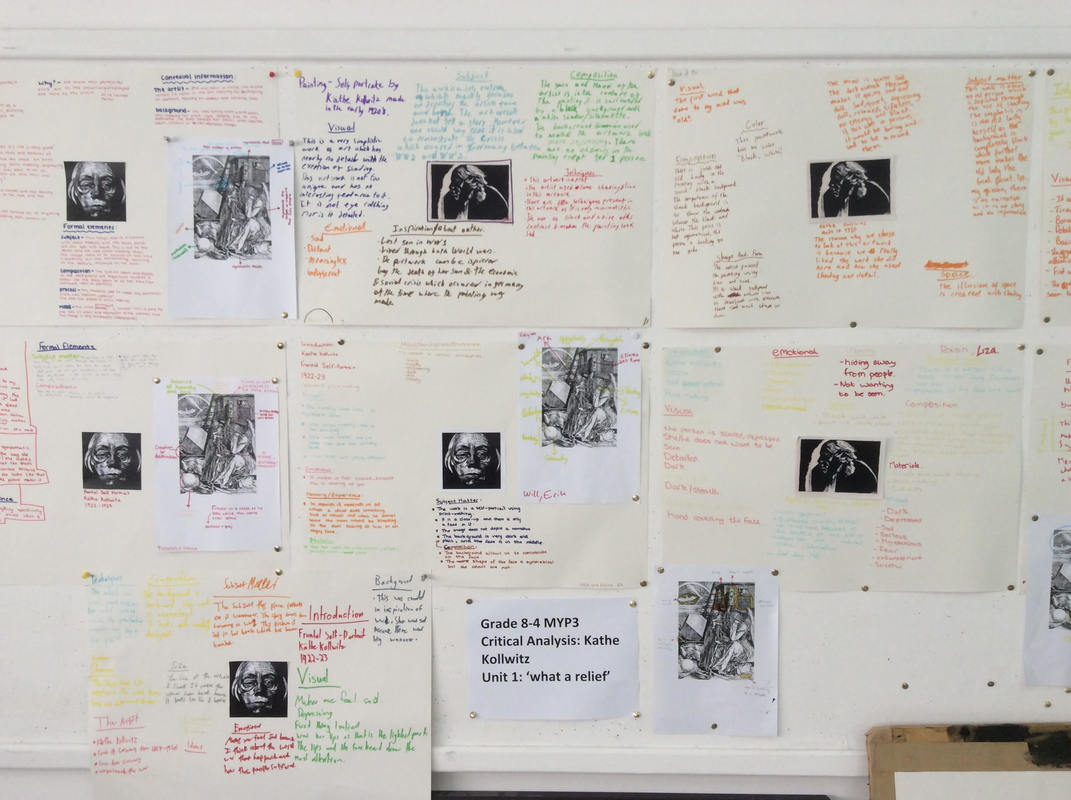
- Before planning your own piece we are going to investigate the work of Kathe Kollwitz. She made lots of self portraits and lots of relief prints and drawings. You are going to analyse one of her images using the language of formal qualities/elements ( some times we refer to these as Elements and Principles of Art). We will analyse an image together and then you will try individually. Once we have done this you we will gather some CONTEXTUAL information about the artist to try and understand why she made her art - what her INTENTIONS were.
- Mind map of 'identity' - about yourself. You are going to be deciding on your own INTENTIONS for your self portrait print. You will be writing a STATEMENT OF INTENT.
- Planning and gathering source material. Working towards a drawn/painted draft that we can use to make our print from.
| |||
Next lesson you will be making your first summative piece. Below is the rubric I will use to grade this.
| drawing_of_your_hand.docx |
Use the button below as a guide to how to set up a website.
Things to remember:
Things to remember:
- choose a 'portfolio' theme/template
- take off all content that comes with the template - this is easy, I will show you
- when you are asked to choose a domain name you need to choose a 'subdomain of weebly.com' - this is the free one.....
- make sure you use a password you will remember - write it down
- do NOT use chrome...... use safari or firefox
- if you have a website from grade 7 you can use that one - just make a page called 'grade 8 and make all our units 'sub-pages' of that.
- when you upload photographs of your work you may need to resize them if you have images that are larger than 1 mb.
- You need to keep a record of all of the work we do - you will need a device with you for each lesson from now on.

Welcome to your Grade 8 Visual Art course! Before we begin our first unit together we need to:
- establish some base line expectations
- make sure we all have a laptop/device next class
- do some pre-instruction drawing.( and prepare our folder)
- understand what perception means.......
- tonal exercises
- crumpled paper and cup - setting a toned ground (tonal gradation, tonal value, tone versus line)
- Egg on paper
- Hand practice drawing
- Hand final - summative
- Planning phase - investigation: portraiture, print making, writing statement of intent
- print making practice. ( if you haven't yet printed your 'ball on a table' piece you can do that when you have finished all the other tasks).
- Print making - summative - make sure you post an image of your favourite final print.
- Reflection (process documented throughout unit). Make sure you refer to the vocabulary of the Unit Overview and ATL skills in your reflection. WWW and EBI.
